Showing posts with label fall. Show all posts

November 16, 2012

Fabric Pumpkins

** This is my second post today. If you are looking for the Handmade Holidays Blog Hop, please scroll down or click here.


Today is the final post for the favorite challenge project on the Pink by Design blog and we are sharing projects that are not cards. I have been seeing these fabric pumpkins all over pinterest and just had to make some too! There are lots of patterns going on here but each one incorporates a little bit of gingham.


This version is a little more squat than others I've seen and is quicker to stitch up too! Rather than sewing together three sides of a panel, cut a circle and stitch up only the edge. It's so quick and easy that you can even do it by hand - which I had to since my sewing machine is on the fritz!


This large one is my favorite and used a jumbo gingham fabric. I added some die cut leaves (felt and glittered paper), a sentiment and tag from Everyday Banners and a couple buttons. 


The middle one is extra girly with a pretty floral fabric. One leaf is stamped with the Gingham Background and again I added an Everyday Banners sentiment and tag plus a glittered button and bow made with my 3 Girl Jam bowmaker. To balance out the feminine quality of these pumpkins and to make them a bit more seasonal, the stalk is cut from an actual tree branch wrapped with hemp twine to give the look of a dried up vine. 

And if were wondering - yes that hemp is leftover from my middle school hemp necklace making days. How it stayed around so long, I have no clue :)


The smallest pumpkin uses a few of the circles from Nature Walk to stamp onto fabric using Crafter's Ink. This time the glitter is on the fabric and the gingham comes in the form of a bow. 

If you have a chance, link up your projects using your favorite pattern on the Pink by Design blog for the chance to win a $10 gift certificate to the Pink Store. It can be a card, layout, tag, altered project - whatever you have in mind. We love to see your PBD stamps but any stamps are okay too!

Have a great weekend!

October 15, 2012

Fall Always Love You


Happy Monday! My little babe is now at the 3 week old mark and I'm finally feeling like things will be back on a schedule soon. Not quite yet but I am starting to see it on the horizon :)

This is a layout I created for the last theme over at Paper Issues - Fall'n For Flair, sponsored by A Flair For Buttons.  Sadly the page was finished waiting for photos and I only got to finish it this weekend. Better late than never!


The photos are some I took via Instagram on school picture day and the product is mostly valentine's day stuff inked and altered to give it a more weathered, autumn-y look.

There are a few goodies snuck in too from my Last Summer Romance kit in the PI shop - only 2 left in stock!


Our little sweeties. However did we get so lucky to have such good looking kids? I bet every mom says that :)

Have a great day!

September 21, 2012

Fall + Harvest Dress


Fall is here!! Hooray for my favorite season! We did a bit of decorating (which I'll share later) and visited the Harvest Barn for my preschooler's first field trip last week. So fun!


Tractor rides. Climbing on hay bales. Petting goats. Picking the perfect tiny pumpkin. Apple cider and pumpkin spice lattes. Check, check, check.


I made her this little green and brown dress especially for the occasion. It was a maternity dress that doesn't quite fit anymore, but the print has a certain harvest-y, little house on the prairie feel to it. I just cut off the bottom, added a band and reattached the sleeves. Easy peasy.

Enjoy your first fall weekend! Hoping our baby shows up to celebrate it too :)

September 6, 2012

Grateful Anniversary card


Stop on over to the Pink by Design blog to check out this anniversary card I am sharing there today! My husband and I passed the 3 year mark last weekend and luckily for him  thankfully I am just as forgetful with dates as he is so we will be celebrating a week late :)

Have a great Thursday!

November 21, 2011

Gift Packaging with the Rollagraph


Hello! Today I wanted to share a project and video that I created for the Clearsnap blog a few weeks back.

Now that November has begun, the season of gift giving is already upon us and what better way to show your loved ones you care than by translating the gratitude and appreciation you feel for them not only in the gifts you give but also in the way you present them. Have your scrap supplies moonlight as gift wrap so you can take a little time off.


I created this autumn themed gift box to hold homemade treats for some of the people we appreciate having in our lives - the mailman, bus driver, etc - that we are not necessarily on gift-giving terms with but are definetly grateful for the services the provide. Not to detract from the sentiment, but it also means less to do at Christmas time.


This concept can easily translate to a Christmas or birthday theme - and for the smile you'll put on the recipient's face, it is worth every bit of effort.


Click on the video link below to see the complete tutorial.


Clearsnap Supplies-
Jumbo Rollagraph Stamp Wheel - Simple Dots
Standard Rollagraph Stamp Wheel - Blocks of Nature, Film Strip
Rollagraph Self-Inking Handle - Standard, Jumbo
Rollagraph Pad-Inking Handle
Rollagraph Ancient Page Ink Cartridge - Chocolate (Jumbo), Pine (Standard)
Colorbox Pigment Ink - Black
Colorbox Decades Ink for Graphic 45 - Dark Cashmere, Venetian Lace (available through Hampton Arts)
Design Adhesives - Orchard Spray
Designer Foils - Lucky Penny
Top Boss Embossing Powder - Black
Clearsnap Glitter - Peridot
Glue Gloss

Other Supplies -
Stamps - Hero Arts (wreath), Basic Grey (sentiment), PTI (leaves)
Cardstock - Bazzill Basics
Patterned Paper - Bella Blvd (plaid), Crate Paper (orange)
Score Board - Scor-Pal
Dies - Spellbinders (scallop circle, flower) PTI (leaves)
Embossing Folder - Cuttlebug
Die-Cutting System - Sizzix
Jewels - Making Memories
Ribbon - Joann's
Twine - The Twinery
Adhesive - Therm-o-Web, Scor-Pal
Other  - stapler, scissors

November 2, 2011

Gift Packaging


Hi! Today is my turn on the Clearsnap blog. Check in and check out my video tutorial on creating handmade gift packing for the holidays using the Rollagraph and some other brand new supplies that will be released at CHA-W. Thanks!

October 14, 2011

Mums the Word

Last week we visited the Howell Pumpkin Patch for the very first time. It was beautiful and so much fun - sure to be a new tradition. (photo overload ahead)


October 8, 2011

Trick*or*Treat Blog Hop with Crafter's Workshop


Welcome to the Trick-Or-Treat Blog Hop!
October 8-10, 2011

Crafter's Workshop and Clearsnap have teamed up for the next three days to create hauntingly inspiring projects for this Halloween season. It's all tricks, treats, and techniques so join us on a fright night jaunt to remember, hopping from blog to blog. Leave your "Trick-or-treat" comment on each blog in the hop in hopes of winning candy, blog candy that is! For every 50 comments posted on this blog we're giving away a set of inks and accessories to spook up any crafter's projects!!! We'll choose the winners from the blog comments posted on all the blogs in the Hop. The prize includes Smooch Spritz in Frosted Grape, Green Olive, and Carrot Cake, ColorBox Pigment InkPad in Spooktacular, Glitter in  Grape Fizz, Design Adhesives in "Trick or Treat" and "Eeeeks!?", plus our new Design Foils in Lime Burst. That's alot of spook to go around!


In addition, The Crafter's Workshop is giving away these fabulous templates valued at $35! More than enough goodies to get you started on all your Halloween themed crafts!


Here's the artsy spooksters to visit along the way:

Clearsnap
Crafter's Workshop
Sabrina Alery ===> you are here
Julie Fei-Fan Balzer
Charlotte Jenkins
Mary Dawn Quirindongo
Karen Grunberg
Jennifer Priest
Jen Clark
Daniela Dobson

Receive extra entries in the Hop for following us on Twitter and Facebook and for tweeting or posting on Facebook about the Hop - just post here afterwards that you have followed us or posted about the Hop to increase your chances to win. Happy Hopping!!!


Today I am sharing with you a layout that is a little more fall themed but still has all the essential Halloween colors going on plus the rich jewel tones of autumn :)


Gosh these templates are amazing! I am really inspired by the artistic flair Julie Fei-Fan Blazer adds to all of her projects and somehow using her templates just drew out the inner graffiti artist within me. To create this background, I layered each of the different templates and sprayed with a heavy dose of Smooch Spritz. That is 10 layers total of spray and my paper is as flat as when I began - love this stuff!


On the top layer of rain drops, I outlined a few random raindrops with red Smooch and then added the Herringbone template by painting with Pigment Ink and a foam pad loaded onto my stylus. Edith was the final layer on top.

For the title, I drew upon a quote from the movie Vanity Fair. Remember the scene where the father of Jonathon Rhys Meyers tells him he can have anything he wants if only he will reach for it? I think he was talking about material things but here its expanded a bit to inspire dreams and goals.


The photo is from a recent trip to the Pumpkin Patch - they have fields of beautiful mums that are just begging to be photographed. My little one loved every minute.


For the leaves, I traced around some real ones we collected from the backyard and inked them up for a pretty and natural embellishment.

Supplies:
Balzer Designs Templates by The Crafter's Workshop - Rain 12x12, Edith and Maude 12x12, Herringbone 6x6, Bliss 6x6
Smooch Spritz - Candle Glow, Gingersnap, Cosmic Pink, Evergreen, Olive Green, Hollyberries, Black Velvet, Silver Foil, Vanilla Shimmer, Log Cabin
Smooch - Siren
Colorbox Pigment Ink - Robin's Egg, Lime
Colorbox Decades Antiquing Dye Ink - Venetian Lace
Stylus Starter Set
Cardstock - Bazzill, DCWV
Alpha Stickers - American Crafts, The Paper Studio
Bling - Basic Grey, Bo Bunny, Cosmo Cricket
Adhesive - 3M, Therm-o-web

Thanks for dropping by! Don't forget to leave a comment before your next stop on the hop, Balzer Designs.

January 6, 2011

snapshots

This layout was created last week for the Sunday Sketch and the weekly challenge at Studio Calico. The sketch was based on a page by Susan Weinroth. The challenge was to use photos off of your camera phone. I don't take too many pics with my phone but these ones worked out well for a snapshot of our late summer/early fall.


There were some gorgeous Ferragamo dresses from the resort collection that caught my eye and I wanted to use the color and vertical/horizontal stripes on a page. You can see the solid dress on the left is represented on the lower level of the page and the top level represents the dress on the right with the patterns and colors going this way and that. I stitched each piece together to give it a patchwork look.


And here are a couple close-ups. Had to throw in a little sky blue, grasshopper green and a touch of pink to give it that feeling of late summer just before the leaves start to turn.
 
Gotta go, I believe the UPS man just pulled up!!

November 26, 2010

Give Thanks with a Pop of Orange

Hope all you lovelies had a wonderful Thanksgiving with family and loved ones yesterday! I was abruptly awoken at 5 am with touch of the flu so did not get to enjoy all the rich foods (well not for more than a few minutes) that make this day one I look forward to all year. No worries, I'm feeling much better today and have eaten far more than my share of pumpkin pie.

Here is a card I planned to share yesterday that was created with a little color inspiration from the busy, busy girls of Design Dollies. Who would have thought it was possible to create using black, white, gray and orange with feeling too Halloweeny?

(Sorry about the bad lighting and glare, this whole dark by 5 o'clock deal is kind of hard on my limited picture taking abilities.)

I added a little stitching, some grey paper from a Halloween party invitation and some very difficult rub-ons and although this is not a color scheme I would have come up with on my own, I really like how the card turned out. What do you think? This challenge is up until Sunday the 28th - you should play along too!

November 19, 2010

Thanks with Dessert


We really are lucky to have such great neighbors and rather than waiting til Christmas to share my appreciation, I got a head start by baking and making a few cards to hand out during this season of gratefulness. It's so wonderful to know that if we need a last minute babysitter, someone to jump start the car battery or even someone to till the garden, help is only down the road.

My favorite of the set:


I found this amazing recipe for Pumpkin Apple Streusel Muffins on All Recipes and doubled it to make one set of muffins and two loafs of bread. The flavor from the apples and spices is so yummy and you get all the health benefits of pumpkin but the flavor doesn't take over. I substituted 1/4 of the sugar with brown sugar and 1/4 with honey to give it even more depth. Moist and delicious. Will definitely be making this again next autumn.


Who are you grateful for and how do you show them appreciation? I'd love to hear!

November 18, 2010

1 Little, 2 Little, 3 Little Indians


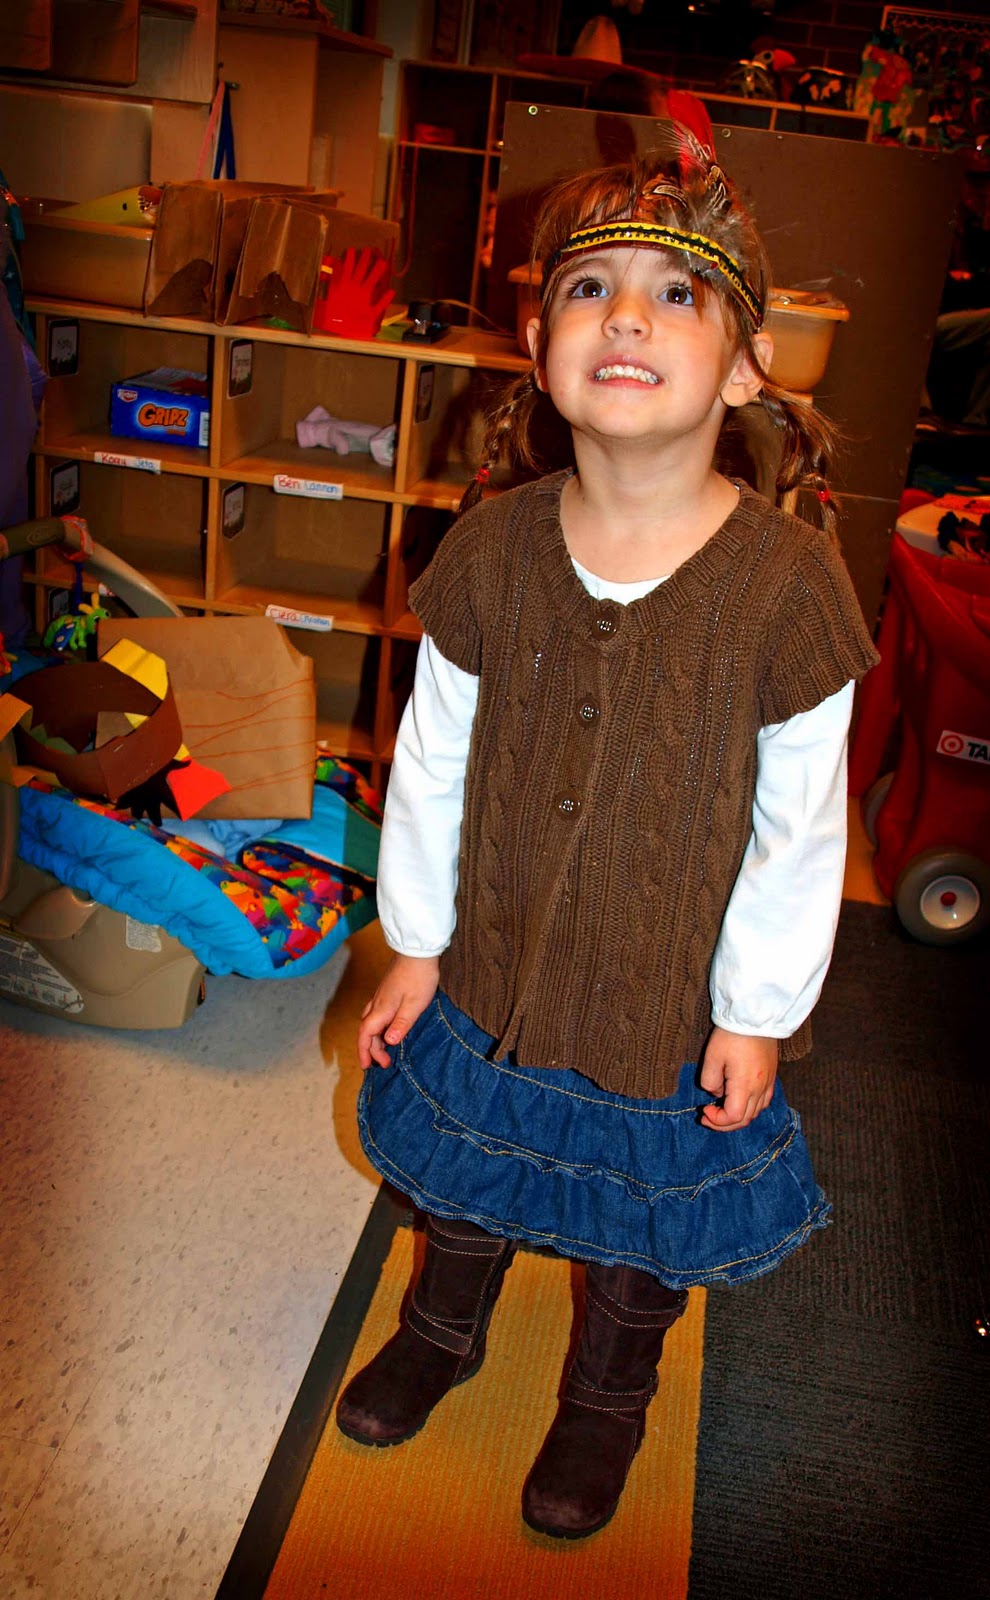
Yesterday at preschool the teachers put on a Thanksgiving feast, and the kids dressed as either Pilgrims or Indians. I put together this little Indian headband for Leah to wear using a leather belt for the band, a bit of ribbon and some pheasant feathers. Placed on top of two braids, she played the part well.

 A couple pics from inside the classroom:


If you plan on making something similar for your child (or self!) or just need a couple moments of calm, I recommend heading over to Little Doe to check out the gorgeous nature inspired headpieces that seem to be popping up in every style magazine I see. It immediately takes me back to center.


November 16, 2010

DIY: Natural Grass Wreath


 Autumn in nearly over and in just 10 short days we will be digging out the Christmas decor! Can you believe how fast this year went by or was that just for me?! Other than the grass and stick display on the porch from this post, I have completely neglected decorating for Thanksgiving. No worries, because I'm making up for it this week with 4 posts full of thankful projects. Starting with today, I'd like to show you how to make a natural grass wreath with nothing more than some overgrown grass, twine, two hands and your knee.


Step 1: Gather some tall, dead grasses. If you live in a rural area like us, it should be plentiful in the ditches and along the road and if not, this may be the perfect opportunity to get out and take a little nature hike! Dry grass is ideal but if it rained recently (or snowed!) in your area, just hang the grass upside down for a couple days to dry out.


Step 2: Tie the grass together at six inch intervals with some twine. 


Be sure to tie it tightly.


Leave the fuzzy seed tail ends loose.


Step 3: Using your knee, break the grass between the tie-offs along the entire length of the grass stalk. Then go back and break where the ties are. This will make it nice and pliable and easy to shape into a circle.


Step 4: Twist and bend into a wreath shape and secure with more twine. You can make it more circular or more oval if you like.


Step 5: Decorate as you please. I twisted 3 yards of glitterly ribbon around the wreath.


Tied it around the hook with a bow.


Added another bow from this tutorial, cut off the grass seed ends and tucked them in behind the bow.


Punched some paper leafs with Crate Paper's Chemistry.


Secure with stick pins.


And there you have it folks - a natural grass wreath! I realize these are probably pretty cheap to buy but the best part for me was taking the kids out, finding the perfect grass, cutting and hauling it back up to the house and basically making something pretty from nothing. The kids are proud of it and I am too.