Showing posts with label fabric. Show all posts

November 16, 2012

Fabric Pumpkins

** This is my second post today. If you are looking for the Handmade Holidays Blog Hop, please scroll down or click here.


Today is the final post for the favorite challenge project on the Pink by Design blog and we are sharing projects that are not cards. I have been seeing these fabric pumpkins all over pinterest and just had to make some too! There are lots of patterns going on here but each one incorporates a little bit of gingham.


This version is a little more squat than others I've seen and is quicker to stitch up too! Rather than sewing together three sides of a panel, cut a circle and stitch up only the edge. It's so quick and easy that you can even do it by hand - which I had to since my sewing machine is on the fritz!


This large one is my favorite and used a jumbo gingham fabric. I added some die cut leaves (felt and glittered paper), a sentiment and tag from Everyday Banners and a couple buttons. 


The middle one is extra girly with a pretty floral fabric. One leaf is stamped with the Gingham Background and again I added an Everyday Banners sentiment and tag plus a glittered button and bow made with my 3 Girl Jam bowmaker. To balance out the feminine quality of these pumpkins and to make them a bit more seasonal, the stalk is cut from an actual tree branch wrapped with hemp twine to give the look of a dried up vine. 

And if were wondering - yes that hemp is leftover from my middle school hemp necklace making days. How it stayed around so long, I have no clue :)


The smallest pumpkin uses a few of the circles from Nature Walk to stamp onto fabric using Crafter's Ink. This time the glitter is on the fabric and the gingham comes in the form of a bow. 

If you have a chance, link up your projects using your favorite pattern on the Pink by Design blog for the chance to win a $10 gift certificate to the Pink Store. It can be a card, layout, tag, altered project - whatever you have in mind. We love to see your PBD stamps but any stamps are okay too!

Have a great weekend!

August 23, 2012

Guest Contributor @ Sew Mama Sew


And just one more thing to share - I have a guest post up on the Sew Mama Sew blog today - Finishing A Garment Without A Serger. If you are interested in sewing but want results that look more handmade than homemade, take a peek at this article. They have tons of other fantastic sewing tutorials too and a shop full of beautiful, high-quality designer fabrics.

Thanks sew much for having me SMS :) It's such an honor!

August 22, 2012

Fabric Stamping!


Hey there. 2 posts today wow!! Just letting you know that I have a new video tutorial up today on the Clearsnap blog combining two of my favorite things - fabric and stamping!! And it uses a brand new stamp set from the My First Colorbox line.

You can check it out here.

The Strawberry Muffin Blouse + Free Pattern


Hooray!! I have a new free pattern for you today, modeled by the lovely Miss Leah!

So I really wanted to call this pattern the Strawberry Muffin Top. It kind of makes me giggle. But my husband, who is about as crass as they come, thought it was mean and that no one would want to make their little girl a muffin top. So I changed the top to blouse. Was he right?


The empire waist with the more narrow lining kind of reminds me of the way a muffin puffs over the top of the pan. And the colors are very reminiscent of a strawberry. A Strawberry Muffin. Top, blouse - hey even a dress if you lengthen the lower panel :)

The extra details on the bodice make this top extra special. What little lady doesn't get excited about a couple of ruffles and jumbo buttons?! None that I know!


The back has a pretty keyhole detail as well. And I love that no zipper or button panel are required.


The shoulders are quite simple to keep the focus on the other details, but add a nice pop of color in a contrasting fabric. Very fun to sew and I think she likes it too :)

Download the free pattern here in size 4/5T.
(And if you enjoy and appreciate the free-ness of this pattern, I would love if you'd consider becoming a follower of this blog - pretty please with cream and sugar on top?)

And view the video tutorial below.


Hugs and love, Sabrina

July 25, 2012

Quilt-y Progress


Remember this quilty post from way back in January? No you say? Well here is the quilt I started and am now just getting ready to finish. Eek! It's been only 7 months right? Was originally going to be a throw for the couch but will be much sweeter on baby's bed.


It also ended up quite a bit larger than crib size at about 54 x 70 inches but will transition nicely to a toddler bed and I do plan on making a couple more small blankies as well.


All of the patterned fabric is from the Nicey Jane and Modern Meadow lines - I've been hoarding saving it for several years now. Am not really a fan of all the baby blue's and these colors are perfect. If only there were a bit more orange. 

Hubby, grandma, and a few other males think it is very gender neutral - okay for a baby but not a little boy. And I suppose if you focus on the flowers, but idk. I'd never choose brown, blue and green for a little lassy.  What do you think - not boyish enough?


Just in case they are right, the back side is mostly brown with just a couple strips of blocks so it can be reversed. Two layers of batting for extra warmth and coziness. Now I just need to add the binding and it will be all ready to go!

 Hooray!!

July 5, 2012

Star Spangled Apron Top


Hi there, how was your 4th? We visited family, went to a fireworks show and did a lot of lounging around yesterday. It seems like we've been doing a lot of that this week - just hanging out and playing, trying to keep my little gal entertained while her siblings are on vacation.


Other than kiddie crafts and going to the beach, I did steal a few minutes to make Scattered Thoughts of a Crafty Mom's Fitted Apron Top that was shared on Prudent Baby last week. Such an adorable summer design! I added a belt around the center so there would be 2 ties in the back.


But unfortunately did not make the bodice quite wide enough to cover more of her back. It should be okay with a swimsuit top underneath though. What do you think?


She has worn in several times now and tells everyone who gives her a compliment "thanks, my mom made it for me" with such pride. Makes it worth all the effort! Hoping the charm of mama-made clothing lasts a long time :)

We are off for a swim, have a great day ♥

June 29, 2012

Pink by Design Release Hop


Hi and welcome to the Pink by Design stamp release blog hop!! There are so many adorable new stamps being released this evening during the Ustream and know Sarah is going to have some amazing prizes to give away too!! Also, be sure to tune in to find out who won the Silhouette Cameo!

So onto the new stamps! I had the chance to work with the Tooth Fairy set which contains several adorable sayings and coordinating images too!


And with it, I created a little pillow to contain lost teeth while they wait for the tooth fairy to arrive. It hangs on the end of the bed and I bet it makes it much easier for her to trade out teeth for treats without waking little ones ;)

This was an idea found on Pinterest, which contains tons and tons of cute ideas for depositing lost teeth - all of which would work great with this stamp set.


The backside has a little pocket with felt tooth applique.


I stamped directly onto both the fabric and the felt with Crafter's Ink. You can also stamp on fabric with Chalk Ink. Heat set either with a heat gun or hot iron to set the color into the fabric and make it permanent and washable!

And that's all from me today! Please leave a comment and become a follower of this blog for the chance to win some blog candy as well! It will have to be a surprise since I haven't taken a pic of anything just yet! :) :)

Next stop on the hop is Elizabeth!

Sabrina ==> you are here
Elizabeth ==> go here next

January 11, 2012

New Quilt Fabric!!


One of my goals for last year was to sew a large quilt for the couch, buuuut I never got around to it because it's such a big, time consuming task. This year I will (start and) finish it and I have a plan to do it and am allowing myself until April to complete it. One small task at a time.

Above is the poor, neglected fabric that will go into the quilt.

And here is the tutorial I am using by Crazy Mom Quilts.

Wish me luck!


January 9, 2012

Parliment Tiered Maxi Skirt


Finally! I had a chance to take a photo of the maxi skirt I made in December. It feels so elegant and was the perfect thing to wear to the ballet. A big beautiful column of winter white.


Of course I had to sneak off alone to take the pics so the 3rd column is flipped up in every photo unknown to me until editing. Buuut since it took so long to get any pics at all I figured I could live with it :)


This gorgeous embroidered fabric was sent to me by my lovely friend Jacinta of Model Mumma. The tag said it was made in Switzerland and it is truly the most luxurious fabric I've ever worked work. Thank you a million times over Jacinta!!


For the pattern, I layed out a maxi dress and traced the shape onto muslin, rounding out the hip area a bit and slimming down the width to make it more form fitting. Each layer of the lacy material (I'm not sure what you'd call it, do you?) is sewn directly onto the muslin and overlaps the next layer by about an inch from the scallop.

You can see in the second photo how the material bunches up at the top layer. If I did this again and if you try it, I def recommend ruffling the fabric for the top layer to give a little room for movement and so you don't get the same bunching. Or maybe just making the whole dress a bit wider. That might even work better!

The waist is cinched with a wide black strip of elastic which makes it easy to slip on and is great for keeping your top perfectly tucked in. I scored this grey silk beauty at a thrift shop, tags still attached!


So do you like it?! Cause I just LOVE it and it makes me feel so pretty.

Also wanted to mention how honored I am to have my Taking Flight top included in the Best of Burdastyle - Handpicked of 2011!! It's in there along with some really amazing designs like the Ruffled Trench and cute bow shorts. Definitly worth taking a look!

Have a wonderful week!

December 8, 2011

Sweet Sugar Plum Birthday Dress

Hey there. I've been MIA this week - but not for lack of material to post. The mornings are so busy if I don't preschedule a bunch in advance then I just never get around to it.


Anyway.... I want to share the dress I put together for my little miss' 4th birthday. She requested a purple dress this year and we picked out some very pretty pinky/purple lace from Ben Franklin. It took almost 15 yards to make a size 3T!


The shape is just a basic A-line - I taped together a bodice pattern with a skirt slip pattern and did a little snipping here and there to create the shape I was going for.  The lace is sewn right onto a good quality muslin without any ruffling - that might have been even cuter though!


I tried the keyhole neckline again - such an amazing alternative to sewing in zippers! The button closure was covered with a bit of scrap fabric that was that same shade of purple. For the dress lining I used an old ribbed sweater so it would be extra cozy and warm inside.


The sleeves are my favorite part of this dress!! I wanted the shoulders to be very poufy but the sleeves to be slim. I cut down a pattern for regular sleeves but still had to make a 1" seam to create the very slim silhouette. They could have been just a touch longer but it probably would have bothered her and gotten into her food - still a messy eater - so we compromised.


And one more look at the front view :) I don't like taking photos inside with the flash but it has been so cold here there is just no going out without the heavy artillerary for even a few moments. We picked out some black sparkly tights to go with and she has been asking to wear both every single day this week and has thanked me about a million times. I am just so glad that she loves it. Every little gal needs to feel her very best on her special day.

Hopefully I'll get a chance to post my new skirt tomorrow. Night!

November 6, 2011

Handmade Holidays Blog Hop - Day 3

Welcome to the day 3 of the Handmade Holidays Blog Hop!!!


Calling all crafters! We’ve gathered designers from some of our favorite manufacturers to show you ways to create something from the heart this holiday season. This 3 day Hop includes over 60 stops with inspiration brimming from every corner. Explore all thoughtful and frugal handmade gifts you could make for the holidays, all in one place on this Hop!
_____

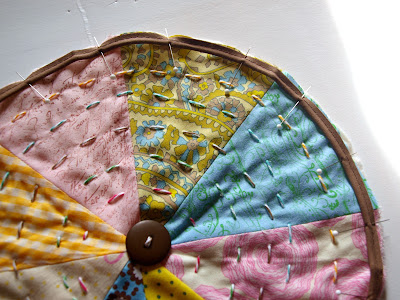
For your friends and family who love textiles, I've created a simple round pillow that will clean out your scraps bin and will certainly add some life to your loved ones living space.


Can you tell which fabrics are stamped and which are pre-printed? I used several of our Rollagraph designs to add some interest to plain scrap fabrics with Crafter's Inks which are perfect for stamping on materials other than paper. A must have for every DIY-er!


To create this project you will need:
- Clearsnap Rollagraph - Simple Dots, Doll Faces, Wordwords, Floral Breeze
- Colorbox Crafter's - Brown, Fresh Green, Sunflower, Orchid, Royal Blue
- twine from The Twinery
- scrap fabric (solids, prints, vintage, modern), ironed
- material for lining (fleece, batting)
- pillow stuffing
- piping
- 2 large buttons
- sewing machine
- needle & thread
- triangle pattern (download here)

1. Print out and cut out the pattern pieces. Cut 16 triangles from material to create both sides of pillow. This will create a 10" pillow.


2. Stamp on solid fabrics. You can use the Rollagraph to simply roll on the design or create a little extra detail by using a simple masking technique -  (a) lay punched shapes on material (b) roll on stamp design (c) remove punched shapes and stamp in the negative area


3. Arrange triangles and stitch together using a 1/4" seam. Sew all pieces into quarters, then in half and then sew halves together.


Be sure to snip off these extra little tails to ensure an even seam.


4. Trace your circle onto a piece of batting or fleece and cut out 2.


5. Attach pillow front to lining with a button and twine, then "quilt" the material by hand-stitching with twine in concentric circles. A little wonky works with the scrappy look here. :)


6. Pin the piping to the edges of the pillow fronts. Placing the pins horizontally this way means you can sew over them and helps keep the piping from moving.


7. To give the pillow depth, cut a strip 2" wide and approx. 32" long. Pin onto pillow front in between the piping pins. Stitch on both using a 1/4" seam. Pin the other side of the pillow (right side facing in) and stitch together.

8. Turn the pillow inside out and stuff with filling. Stitch up the small opening by hand.

And that's all! So, sew simple and the custom fabrics will be sure to put a smile on the faces of your fellow fabric lovers! Onto the hop info...

____


To sweeten to Hop, we’re offering a gift for you! For every comment you leave on the blogs in the Hop, you’ll be entered to win a prize pack from one of the participating manufacturer sponsors! Receive extra entries by doing the following, and then coming back here to leave a comment to let us know what you did:

Share about the Hop on Facebook
Share about the Hop on Twitter
Share about the Hop on your blog
Follow us on our Facebook Page http://www.facebook.com/pages/Clearsnap-Inc/159309607440898
Follow us on Twitter http://twitter.com/#!/clearsnap
Follow us on Pinterest http://pinterest.com/clearsnap/
Follow us on YouTube http://www.youtube.com/clearsnap
Follow our blog


Visit the list of blogs below and leave a comment on each by Nov 7, 2011 at 11:59 PM PST. Each day we will be sharing a brand new list of blogs with brand new projects for you to explore, be inspired by, and create from!

Nov 6
Sabrina Alery - Clearsnap ----> you are here

Cheers to creating gifts from the heart this holiday season!

Happy Hopping!

November 4, 2011

Handmade Holidays


Today is the first day of the Handmade Holidays Blog Hop with Clearsnap and some other wonderful companies! Along with some great inspiration, you'll also find several ways to win a great prize package! Click here to start the hop.

I'll be posting on Sunday and here is a little sneak peek of the project I'm working on using the Rollagraph and Crafter's Inks...


Have a great weekend!

October 27, 2011

Halloween Costume: Little Mermaid


Yesterday I finished up the final kiddie costume! Saved the hardest one for last since I never did find a pattern that was just right. The green sequin material and netting came from Joann's and the purple is from a thifted wrap top and tank. Pattern was made from measuring her clothes.


We couldn't do the sea shell top because it will just be too cold so I sewed in a tank top covered with a sheer top. It's just disassembled from the wrap top and sewn together in a smaller size. Left an opening on the outside of the sleeves and added in a couple fins there. Ariel doesn't have those, I was told, but she did accept it when the costume was finished.


There are fins on the sleeves and also on the hips. I put a wire stem in each one to help them stand up a little.


And the tail. It was so hard to make this look realistic and easy to walk in. We settled in the middle and added some extra ruffle detail to make up for the lack of authenticity. There is about 2 yards wide of tulle ruffled together to help it poof out. Hmm, maybe I could just sew an extra triangle of fabric in between the fins? That might look much better.


Added a fin in the back as well.


My little gypsy fish. We're off for the first round of trick-or-treating tonight at the zoo. What are you planning to be or will you dress up at all?