Hello, hello! Today is the reveal day for the new Sketchabilites sketch and also the final sketch of my term. I used the sketch to scrap these photos of my daughter riding a horse for the first time ever. And wow, was it love at first sight - she took right to it and could hardly suppress her joy.
September 30, 2011
A Unique Bond - Sketchabilities #56
Hello, hello! Today is the reveal day for the new Sketchabilites sketch and also the final sketch of my term. I used the sketch to scrap these photos of my daughter riding a horse for the first time ever. And wow, was it love at first sight - she took right to it and could hardly suppress her joy.
September 28, 2011
Princess Invitation Set
A couple weeks back one of my bestest friends asked if I could put together some invitations for her daughter's upcoming birthday party - princess themed of course. She is a very girly girl - all pink and purple and sparkles - so it was easy to whip something up that would suit her.
I used the Scor-Pal board to create a gate fold design and layered some papers from Basic Grey Euphoria and SEI With All My Heart (thank you Cassie!). I punched more butterflies from the paper scraps and put them in a little baggie along with the border punch negatives to make a little bit of confetti for the table.
Since the pile was so tall with the brads and pop up dots, I used the Scor-Pal again to make a little box to deliver them all in. Like a purdy present all in itself.
Can't wait for the party, I get to dress up like a princess too!
September 27, 2011
Dry Shampoo by TRESemme
This is a Sponsored post written by me on behalf of TRESemmé for SocialSpark. All opinions are 100% mine.
Not sure if you're like me, but I do not wash my hair every day, in fact I don't really like to wash it at all. On top of wash time, there is blow-dry time, and then style time and *poof* there goes 2 hours out of my already busy day. I would much rather spend that time being productive or playing with the kids. But somehow, the older I am getting and the more responsibilities I take on, the oilier my hair is becoming. It demands to be washed at least every other day, lest I look like I just crawled out of an alleyway to run my errands.
So the point I am getting by sharing a little TMI with you, is that I am so happy to have discovered dry shampoo a few years ago. It totally cuts out the greasiness and lets me carry on with my busy life. And now to find out that TRESemme will be offering their full line of TRESemmé Fresh Start Dry Shampoo is just awesome because it will be available at drugstores!
It is a great product not only for absorbing excess oil and removing odor, but also for whenever your style needs a quick boost and lets you skip a day of shampooing - no water needed! And it leaves your hair smelling like citrus - clean and fresh! The full line of products includes formulas for Strengthening, Volumizing, Moistuizing and Smoothing too.
So let me tell you a little bit about how Dry Shampoo works and how to use it.
- Shake well before use and in between sprays
- Lift sections of dry hair and spray directly at the roots (do not use like hair spray!)
- Leave in for 1-2 minutes
- Use your fingertips or a brush to distribute the product throughout your hair
- If the nozzle becomes clogged, remove and rinse with warm water
You can view a tutorial right here to see the correct procedure to use - I definetly recommend checking it out because she is giving away a $500 gift card to Target! Awesome!
September 20, 2011
Paper Crafts Rejects
Anyway my first reject I was so sure would make it! It's called Silver Lining for the Rainbow calls.
September 19, 2011
Winner Day + Video
Jamie Long! Whohoo Jamie, please shoot me an email so I can get your Random mini-pad over to you!
I also wanted to share a little video tutorial I put together for the Clearsnap blog a couple weeks back. It's for a cutey stamped pencil pouch and was so fun to make using Chalk ink!
Colorbox Chalk Inks have minimal smudging when wet and are more resistant when set up with a heat gun - this is perfect for a project that won't require washing - like the pencil pouch we are looking at today. I love the Paintbox because the colors are already perfectly coordinated for you so minimal planning is required - who needs to add more to their to-do list this time of year?
You can find the complete supply list and some more details right over here.
September 16, 2011
Happy Times - Paper Issues Blog Hop!
Good morning! I'm so glad you could join us here for the 2nd annual Paper Issues Blog Hop! Did you come here from Leah's blog? If not, head back to the PI blog and get started for a chance to win some really awesome prizes from our fabulous design team.
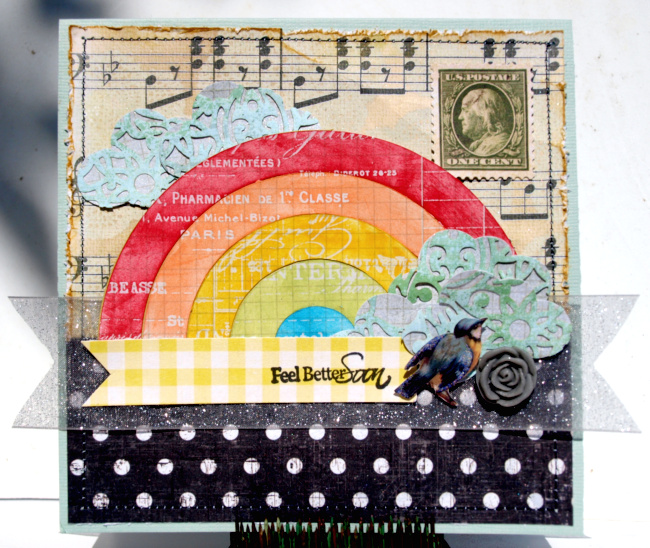
So I'm part of the Altered Team and put together this interactive frame using the new Crate Random line, purchased right from the Paper Issues store - check it out cause Cassie is stocking some awesome deals!
I must say that this is the most perfect paper collection of mismatched patterns I have ever laid eyes upon! Needless to say this project came together - from inspiration to planning to execution - within 1.5 hours of opening my goody box. Love it when that happens!
So the project is housed in a cheap-o Ikea frame and has layers on both the inside of the glass (actually plastic) and the outside. I wanted a place keep my favorite Instagr.am photos and since my fav changes so often, the clip is on the outside for easy change ups.
The paper is mounted on the inside of the plastic and has some paint splatters in white. The title and some other embellies are on the outside in both chipboard and cardstock.
And as you can see from this photo, heat embossing on plastic is not a good idea! It is melted and warbled but still looks kinda cool so I left it as is. I also inked up the title and Polaroid frame behind the photo and added glitter to the moths and Polaroid frame.
To top it off, I added some black trim to hang from. Colorful and fun and makes me smile!
September 15, 2011
Makes Me Smile - Sketchabilities #55
And in case you would like to play along with this fantastic sketch as well, here is the original. Be sure to link up at the Sketchabilites blog for a shot at being the GDT!
September 14, 2011
Tuesday Trigger - Garden Glory
I woke up extra early this morning and had a couple hours to myself so I took advantage by creating this card using the color palette from the current Moxie Fab World Tuesday Trigger. It took a bit of mixing and matching but I finally ended up with something that worked.
And in case you want to play along too, here is the gorgeous inspiration photo. Have a great day!
September 12, 2011
Pre-K, 1st and 2nd Day
This month Cassie of Paper Issues is sponsoring the sketch site Sketch Inspirations and asked if any of us would like to play along too. I volunteered and keeping with the School Days theme, created this page about the twin's first and second day of Pre-K. Aren't they such cutie-pies? And they love going to school each day. Hope that lasts for a long, long time. I used an old Studio Calico kit and then realized I used the exact same kit and many similar papers for their 3-year preschool page last year. Blue is a good color for first day I guess. The journaling is hidden in a pocket behind the page. I also embossed the JBS butterfly stamp in white - my fav stamp ever!
Have a great week!
September 6, 2011
What's New
These two goonies started preschool. They love it so far and look forward to going every afternoon. Believe it or not, I'm already getting the "Hmm, I don't know... nothing" when asked what went on at school. Oh and the teacher already asked if it was okay to seperate them. Apparently there is just a little too much fun going on :)
And this little miss is doing preschool at home with me. I was worried how our stubborn personalities would work together but so far so good! She is especially excited about using scissors for the first time and cuts everything she can get her hands on. Having these couple hours together each day is really wonderful.
Also hoping to share some preschool lessons in the future. There are so many amazing resources on the internet and I love planning the themes and activites to make learning fun!
On Friday the Mr. and I celebrated our 2nd anniversary with dinner and a little gambling. We were both almost too tired to go out but had an beautiful night anyway. He even carried me back to the car when my feet where too blistered to walk. Really need to start breaking out the heels more often! love.
What else? I've been weeding the yard, crafting of course, driving to various lessons, baking and just generally getting adjusted to this busier time of year. I love being productive and getting lots done but always try to jam too much into too small a time frame. So I'm looking for that balance again. Give me a couple weeks and I'll get there. Get back to my regular blogging schedule and to sharing lots more good stuff. See you soon!
September 4, 2011
Made In the USA Blog Hop
Happy Labor Day!
Did you know that all Clearsnap Products are manufactured right here in the United States, at our headquarters in Burlington, WA? They are! Every inkpad is made right here under our loving, careful guidance so that it will be the best quality possible when it reaches your craft table (and for years to come).
To celebrate Clearsnap's commitment to manufacturing products in the USA we have released a Limited Edition 3 Color Pigment Inkpad, MADE IN USA. Our Design Team has created stunning projects with this inkpad to share with you today, Labor Day! This inkpad has only been available to retailers purchasing inkpads and distinctive accessories direct from Clearsnap, as a "thank you" fortheir support of our company.
But we're giving one of these inkpads away!!! Please visit all of the blogs listed below as part of today's blog hop and leave a comment on each blog. Each comment counts as an entry into the drawing. Comments must be posted by midnight 9-5-11 PST to be eligible for the drawing. A winner will be posted to the Clearsnap blog on 9-6-11.
Clearsnap - Colorbox Pigment Inkpad - Made In The USA; Jumbo Rollagraph - Doodles, Wordwords; Glue Gloss
Other - Stamps - Hot Off The Press; Cardstock - Bazzill; Chipboard Letter - American Crafts; Adhesive - Therm O Web; Die Cuts - Nestabilities, Sizzix; Scoring Board - Scor-Pal; Other - Ribbon, Felt, Safety Pin
Instructions:
1. Cut 7 pieces of ribbon to equal lengths and stamp white pieces with stars dipped in red and blue ink from the Made In the USA Inkpad. Allow to dry.
2. Die cut felt and cardstock to create the elements of the badge. I used felt as the backing because it is more sturdy and won't tear when pinning over time.
3. Stamp with Rollagraph on felt and cardstock with red, white and blue inks. Since I used the jumbo size, I had to ink one edge of the Rollagraph wheel then flip it around to ink the other side. The normal size Rollagraph should fit on the multi- colored pads perfectly.
4. Layers your elements together with Glue Gloss and use foam squares to create dimension.
5. Top with chipboard letter "A" and attach pin to the backside of the badge. Give to your own little superstar!