May 31, 2010

Sugarless Milkshakes


Our kids think these milkshakes are the best and I feel good about serving them because there is no sugar added other than what comes naturally in the milk and the fruit. These make a good summertime snack when its too hot to cook and too hot to eat. Also good to sneak in some fruit for a little one who refuses to eat anything other than peanut butter sandwiches or chicken nuggets.

Ingredients:
2 cups milk
1/2 cup plain yogurt
2 bananas, sliced
1 cup berries, chopped
1/4 cup 100% frozen juice concentrate (orange pineapple banana is my favorite)

Instructions:
Place all ingredients in a blender on high for about 30 seconds or until  fruit chunks are pulverized and mixture is frothy. Makes 4 child size servings. Serve immediately - mixture will begin to seperate.

May 30, 2010


Freshly picked flowers are one of the best parts of spring & summer. Here are my pink peonies (before the sun burnt them up) and some greenery & thistles from along side the road.

Hope you are enjoying your Memorial Weekend with family and friends.

May 27, 2010

"A" Frame


I am so excited to have finished this monogramed wall hanging this week inspired by copied from Christy from Sweet Tidings. It was originally meant to be a cover for a scrapbook album but it turned out too flimsy to actually use. The doilies came from my husband's grandma and the brown base fabric was from an old pair of work pants. The "A" is hand embroidered using satin stitch; I also used the same green floss to stitch the doilies on. My husband made the frame from barn board, which I painted and used a staple gun to put staples every 1.5" on the inside of the frame, then weaved the fabric onto it.

Here is the piece I ended up putting as a title page in our 2010 scrapbook. One doily is fabric and the others are rub-ons from Hambly.


I'm off to watch Sherlock Holmes, goodnight!

May 26, 2010

Happy Happy Birthday!


I've been putting this layout off for awhile since I always have trouble with 2 page spreads, not to mention creating a page that would suit a girl and a boy. There are some touches of pink here and there but to me, the overall feel is still masculine. That's okay because the party was garden tea party themed and other than the plastic bug decorations, definitely more girly.

Inside the envelope are some birthday souvenirs along with a note from me that they can read when they are older. The yellow frame is also also packaging from a memory game they received as a gift.

Here is the birthday invitation -


and party decorations (made with help from a crafty friend) -


Hopefully next year they will remember it all. Good night!

May 24, 2010

Goodbye long hair, hello headbands!


After months of consideration and a chin length in-between-cut, I finally decided to cut off my hair for the summer. And I mean all off. I trimmed the back and sides to one inch but left the front a bit longer. Its cool (as in temperature), low maintenance and surprisingly turned out fairly even.

But I'm not in love it with it. My ears stick out too far and let's face it - I'm no Victoria Beckham. But its just hair and will grow back in time.

In the meantime, I will be making lots of cute headbands and other accessories to make sure I'm not mistaken for a boy (hopefully a cute boy?). Here's the first one, inspired by this tutorial at Prudent Baby.


This pic is pre-haircut. Love these colors together - just wish I would have put a strip of black velvet down the center to make it less kiddish. The blue and red fabrics came from a scrap pack I picked up at a thrift store a couple years ago, the green is from Joann.

Goodnight!

May 23, 2010

the view from 3 foot 3

Found a kid tough digital camera at a garage sale for $5 last weekend! The kids have taken nearly 300 pics this last week - its so fun to get their perspective on things. Here are a few of my favs:


Hope you are having a wonderful weekend!


May 20, 2010

Light of My Life


Have been wanting to do a layout with a sun background for a while now, also needed to deplete some of my button stash. Journaling reads, "Aurora, Keegan, Maleah - you three are the loves of my life - you help me find purpose, you inspire me to always do my best, to give my all & to be kind. I couldn't imagine my life without you in it. Each of you shine your own bright and lovely light - I know each of you will do great things one day & will find the path to happiness."

Kinda cheesy, I feel a little embarrassed just typing it out, but very true nonetheless.

Supplies:
   Paper: DCWV, Sassafras Lass, Basic Grey
   Stamp: Basic Grey
   Ink: StazOn
   Alpha Stickers: The Paper Studio
   Markers: Sharpie
   Butterfly Punch: Martha Stewart Crafts
   Brads: Joann
   Other: Buttons, Pearl

Also wanted to share a passage I read today that really put my inner neat freak into overdrive:

"Every possession you have, from the tiniest button to the biggest piece of furniture, takes with it a piece of your time." - Mindy Starns Clark, The House That Cleans Itself

As if I had any extra time to spare. Looks like I will be doing another thorough purging soon.

May 19, 2010

How-To: Scrap Bias Tape + Doll Quilt


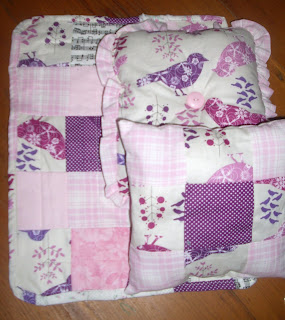
Finished up the second baby doll quilt today, the pillows were completed last week. I am really happy with how these turned out think the girls like them equally.
Since the plain patchwork is so simple to do and I love the homemade look of the scrapwork bias tape along the edges of the quilt, I thought I would share a tutorial with you on how to make it yourself. This is a for a single-fold tape.

You will need:
scrap fabric at least 2"x2"
scissors
hot iron
threaded sewing machine
needle and thread
stick pins


First you will need to collect your scraps and cut several strips of fabric that are 2 inches wide. They can be as long as you like. Make sure the total length of the strips is slightly greater than borders of your quilt.
For example - the doll quilt above is 12.5" x 15".
I add 12.5 + 15 + 12.5 + 15 + 3 for a total of 58".
The additional 3 inches is for seam allowance and for overlapping.

Second, sew all the strips of fabric together with a quarter inch seam allowance - keep right sides of fabric facing. Backstich the ends.

Lay your fabric strip facing down on the ironing board and press the seams flat. They likely won't be wide enough to press open but you can try for a more seamless look.

Starting at one end, fold the strip in half and iron to hold in place, moving down until the entire strip of fabric has been ironed in half.

Next open the strip and fold one quarter section into the middle. Press to hold, moving down the entire strip.

Fold the opposite section into the middle and press with iron. Complete the entire stip. It will now be half of the original size.

Fold the strip in half so it is in quarters and the raw edges are touching the center. Press with iron to hold in place.

Now round the corners of whatever you will be attaching the tape to - it will wrap around the round corner much better than a square corner.

Pin the tape to your project, folding the top edge under where the ends meet.
Pin one side, sew with your machine and then sew the other side by hand.
Or, pin both sides, sew together all at once and avoid hand sewing. I sewed this quilt all at once with the sewing machine because this quilt is for a doll. I would not do this if it was for a person as I don't think it is as secure and some fabric can be missed, especially around the corners where the fabric tends to bunch.

And thats all folks, your very own scrapwork bias tape - coordinated or contrasting to match your next project.

May 18, 2010

dreams

                                           
This morning I dreamt that I landed this job at a scrapbooking magazine I love, Creating Keepsakes but just couldn't get my act together. They gave me a huge office and my first day my boss walked in on me getting dressed. She gave me a strange look but gracefully disregarded the awkward situation. Later in the dream, I really needed to use the bathroom but looked awful and didn't want to show my face to everyone - so I went in a styrofoam cup in the corner of my office and of course, my boss walked in on me again!

This must have something to do with the goals I've set for myself - being productive and staying on schedule, which I find difficult to always do. I have so many things to tend to everyday and somedays I find it hard to get off my behind. At my last checkup, the doctor told me that, no, natural laziness is not a condition and since I don't have any other medical problems, I would just have to figure it out on my own. My only wish is that I had all the motivation I have now to create, make and mend back when I actually had all the time to do it. One day, I will find the balance.

Oatmeal Raisin Chocolate Chip Cookies


These cookies are not overly sweet and somewhat healthy so you can give seconds to the kids. This recipe makes 4-5 dozen cookies, so you can give some away too.

Ingredients:
2 sticks butter
1/2 cup veggie or canola oil
2 cups brown sugar
2 tbsp. honey
4 eggs
1 tbsp. vanilla
3 cups flour (half white, half wheat)
3 cups oatmeal (not quick or instant)
2 tsp baking soda
1 tsp salt
1 tsp cinnamon
1/2 tsp nutmeg
1/2 tsp all-spice
2 cups raisins
1 package semi-sweet chocolate chips
1 little helper (optional)

Instructions:
1. Preheat oven to 375 degrees.
2. Measure out the dry ingredients (flour, oats, soda, salt and spices) and let your little helper dump them into a large mixing bowl. An apron would be helpful here.

3. Let your helper mix up all the dry ingredients with a wooden spoon while you melt the butter in a medium saucepan over low heat.
4.Once the butter is melted, add the brown sugar, stir to absorb and turn off the heat.
5. Add the oil to the butter mixture and stir well.

6. Don't forget to keep an eye on your helper or she will try to use her hands to stir and end up with a floured face!
7. Crack the eggs into a liquid measuring cup and mix well. Add the vanilla to the eggs.

8. Add butter mixture to the flour mixture and pour in eggs as well. Stir until there is no flour residue left in the bowl. Be sure to scrape the edges and bottom well.

9. Fold in the raisins and chocolate chips so they are evenly distributed throughout the dough.
10. Grease your baking sheet or just use parchment paper - it makes it much easier to clean-up and keeps your pans in better condition.
11. Drop the dough by tablespoonfuls onto the baking sheet - you can put them fairly close together because this dough doesn't spread out too much.
12. Bake cookies at 375 degrees for 10-12 minutes. Let them set on the hot cookie sheet for a couple minutes to brown the bottoms. Remove from pan and allow to cool. You can reuse the same piece of parchment paper on each batch - it doesn't stick!
13. Enjoy cookies with your little helper and let them help you bag up a dozen or two to give away - what a delicious way to teach them about sharing and doing nice things for others!

May 16, 2010

Garden Hat


Just can't get enough of those felt dahlias! Got this $2 garden hat at Target, added a ruffled trim, and attached the dalia with a pin so my MIL can wear it as a brooch or other accessory. Love the contrast of the red flower against the blue and white material - keeps it from looking a lot like Christmas.

May 13, 2010

on learning to fish.


As far as I'm concerned, learning to fish is one of those things all kids should learn to do. I consider it up there with learning to tie a shoe or learning to read. Its a basic survival skill.

I recall arriving at Lake Aquabhi to take a little hike with my daughter and a women pulled up in the parking spot next to us. She was very pregnant and had two older girls with her. And they were all had their fishing poles - just them, no men involved. I thought about them on our hike and when the lady and I arrived back at our vehicles at the same time I told her how cool it was that she was taking her daughters fishing. She seemed surprised by my comment - clearly this wasn't uncommon in her family.

Of course no one ever took me fishing, not until I was an adult and now I just don't have the patience to sit on the bank waiting for the fish to bite. But our kids love it and I am happy they have the opportunity to learn this important skill. Even at two years old, my youngest can reel in a two-pounder on her Barbie fishing pole with no help.

I may not be able to teach my daughters the best bait to use to catch each fish or how to find a catfish hole (I'll leave that to Dad) but cooking, baking, sewing - making things from the most basic of ingredients to create something beautiful or delicious - that information I can impart. And one day when they are grown, they won't have to rely on everyone else for all the things they need. That is my goal as a parent - to teach my children to be self-sufficient - to teach them beyond the textbook. Oh and good manners wouldn't hurt either.

May 12, 2010

Go Fly a Kite


Go Fly A Kite - Journaling reads "We spent several windy days this month flying a kite out in the backyard. The kids had no problem keeping the reigns as the wind whipped the kite around and loved chasing after it to toss it back into the air when it dropped."

I really like the colors and patterns on this layout and the birds flying out from the clouds. The green dot paper is laid into the shape of a kite, which is half hidden by the photos. What do you think about the leftover alpha letters as leaves and stems? Is it obvious that's what they are? I've run out of vowels on that set and hate to see them go to waste. The fabric flower was part of a favorite T-shirt that got stained.

Supplies: Paper: October Afternoon
                   Alpha Stickers: Cosmo Cricket, October Afternoon, American Crafts
                   Stamp: Inkadinkado
                   Ink: Colorbox
                   Pen: Sharpie
                   Brad: Crate Paper
                   Other: fabric, thread


Here is another from last week's Studio Calico sunday sketch. This is my very favorite photo from Easter. The girls normally fight over everything and I thought candy would be no exception - and yet here is Rora handing an egg to Leah, who had found less eggs. What a sweet moment to capture.

Easter Hunnies - Journaling reads: "Proof that you are not only sisters, but are becoming friends too. ♥♥"

Supplies: mostly unknown, except this border punch and October Afternoon from above layout